I took a day's annual leave today and got on with some crafting and managed to finish off not one, not two, not three, but four, yes four, projects! Yay!
Here's the advent calendar - all done. I could do more but am thinking less is best (read that as I can't be bothered).
On to the Christmas bunting - these are presents for my daughter to give to her boss at work and a friend - I love paper bunting and have more to show in a minute... I've even altered an envelope to match the bunting.
I got my sewing machine out and did a bit of stitching - although I did have a problem when I had used double-sided tape as my needle kept getting stuck! Note to self - use glue next time!!
So, on to my next project - this heart bunting. It's a present for a friend who I have got in our Secret Santa - I've just hung it here for the photo. I cut the hearts on my silhouette, alternating scalloped with plain. I then debated on how to hang the hearts off the string and ended up just cutting a little strip and making it into a tab and threading the string through - I think it works :)
That's my four projects - I have started another one, it's a tin that I have covered in matching paper for the heart bunting to go in. I would post a picture but seem to be having a problem with blogger. Perhaps another day.
So, as I said, it was a good day :)
Thanks for looking,
Sue
Showing posts with label Silhouette digital craft cutter. Show all posts
Thursday, 22 November 2012
Wednesday, 14 December 2011
What's on your workdesk? - Wednesday 132
What's on my workdesk this wednesday - well a lot of mess!
The good news is that the light bulbs got fixed in my room that I craft in - I can't call it my crafting room. I do have a crafting room but it's rather small and so I seem to have spread onto the dining room table so, anyway, I have light!
This is my workspace today - I've been having a mega Christmas Card session. Why oh why do I leave it to the last minute every year! Yet again, I've had to discard any ideas of making some wonderfully creative cards and make do with some quick and simple batch cards. I've used the cuttlebug to give some dimension and used a mixture of printing and cutting on my Silhouette for speed.
Can you see the messy pile of stuff with red circles? That's my nearly finished garland. I've been following a free class at Jessica Sprague with classes uploaded every day for a week and I managed to keep up with the class until Thursday. I've still got to embellish the garland a little more and make the box that it goes into for storage. It was a great class and I learnt how to use clipping masks in Photoshop so it was well worth the time I spent on it.
In the foreground is my Mac and my Iphone - I couldn't craft without either of these two. My phone is new and the camera on it is fantastic and even better, it has this cloud that hovers over the phone and when I take my photos it magically floats off and puts them on my laptop without me having to upload them - how brill is that?!
If you want to see what others have on their workdesks follow this link, it's great fun.
Tuesday, 13 December 2011
Wedding Album
I made this couple of weeks ago and the photo has been on my desktop ready to upload but life has been so hectic lately! I've made it in a similar theme to the baby album I made last month. The wedding had a theme of red and blue - "very modern but nonetheless, amazing" - my daughter's words as she was the guest.
I created this embellishment on my Silhouette and it has this amazing function of moving text onto a path ie wavy line, square, or circle as in this case. It opens up so much scope for sentiments etc. The more I play with my Silhouette, the more impressed I am, it's an amazing digital cutter.
Thanks for looking,
Sue
Tuesday, 3 May 2011
silver wedding
Yet another anniversary card - this time for my friend's 25th Silver Wedding Anniversary.
All images are from the Silhouette library - love birds by designer Alaa' K and the entwined heart by Ginny Nilson. I just copied and pasted the lovebirds into rows and then changed the bottom two so they could share a kiss. Gave it a border and then printed it straight onto the card base.
Thanks for looking,
Sue
x
Thursday, 28 April 2011
Ashleigh comes home
Can't believe it! Ash is home tomorrow after being in France for six months working for a ski tour company. She's had a great time but is ready to come home now -and we're well ready for her return.
Thanks for looking,
Sue
Tuesday, 26 April 2011
Journalling Tags
My friend's son is going on a journey - Round the World - what a journey! Lucky thing, I am trying to persuade Steve that would be a good idea for us to do next year as his retirement present to us :)
Thanks for looking,
Wednesday, 13 April 2011
Easter 2011
Just had time to make a quick bag of eggs to send off to Ash with an Easter Card - quite simple but effective. I love Swiss Dots embossing folder - it turns a very plain card into some special, I think. The bag topper is off the Silhouette store which I have turned into a print and cut for speed - much quicker than cutting out each individual piece. just hope it arrives in time for Easter!
Thanks for looking,
Sue
Monday, 28 February 2011
Mother's Day


Yay, I'm getting ahead of myself - not something that happens very often, lol. As i had caught up with Project Life i am trying to look ahead and see what needs making rather than so last minute which is what usually happens. I've even managed to do an insert with a picture - the designs for the front of the card and the insert are all from Rivka Wilkins and are on the Silhouette online store. The little flowers are from my stash - they were used in a layout last year and I had plenty left over - so happy I remembered that I had them as so often I forget what I have and then go and make hard work for myself.
Friday, 25 February 2011
21st birthday card
At last, I've had a chance to make something else apart from Project Life. It's my friend's daughter's 21st birthday coming up. I've cut the numbers out on my Silhouette on white card a couple of times and then once in patterned paper to try and build up the image and make it appear to be like chipboard.
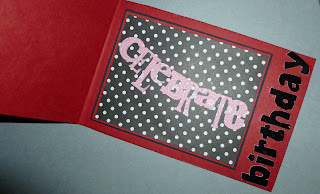
The base of the card is one inch bigger to allow for "birthday" in LD Rock Biter font.
For inside the card I've then matted and layered Celebrate to match the outside of the card. It was a nice change to make a card, will try and get my mother's day cards done this weekend.Thanks for looking,
Sue
Tuesday, 18 January 2011

I've used a sketch by Nichol Magourirk I'm not really sure I like the off-straight top half - it's annoying me every time I looked at it, lol. I'm pretty much a neat and tidy layout kind of gal bhopefully it will grow on me, cos I'm not doing it again - it took me hours to do it.
I've used various October Afternoon papers and elements have been cut in the Silhouette.
Thanks for looking,
Sue
Wednesday, 17 November 2010
December Daily 2010 Preparations
If you haven't heard of Ali Edwards December Daily pop on over to Ali's Blog and find out all about it. I have decided to join in this year and am way behind in my preparations.....as usual. Everything seems to take so much longer than I anticipate and I take forever to make a decision :) I have already changed my mind and after cutting and covering my cover, I decided to change the size from 6 inch wide to 6 1/2 so that I can have a margin and use my Bind it All to bind it together rather than rings. Not sure if I will try and save my cover or make a fresh one.
First CoverAs this is my first year I am pretty much following Ali's design and have used her daily templates which you can find here. I managed to find a few reasonably priced acetates at the Hobbycraft Show last week and being very frugal I cut each one in half to spread the load a little. I've also been printing a few off myself with designs from the Silhouette Store.
I've also used some designs from the store to attach to the front of each acetate with the date.
I've cut some extra numbers and used glossy accents to give them a glaze.
I can't make up my mind whether to cover the back of each day with patterned paper or leave it blank.....see, told you I have trouble deciding.....Will update when I've done a little more,
Thanks for looking,
Sue
Sunday, 12 September 2010
Colours of Autumn
This is my first attempt at brayering - well, the first that I'm prepared to let anyone else see, lol. First of all I masked off the area to leave a rectangle and then used Big and Juice Mountain Meadow ink pad, staying up the yellow and red area. I then overstamped in Archival Ink with the Poppy stamp from Clarity Stamps. I cut the corners on the Silhouette and then just matted and layered with matching Bazzil card. Sentiment stamp from Woodware. It's a pretty simple card and undecided as to what to do next, my daughter said, sometimes less is best!

I'm entering this in the Allsorts Challenge Blog for Colours of Autumn. I'm sad to think Summer is nearly over but I am looking forward to Autumn with the lovely autumn colours and long walks in the countryside, falling leaves, bare trees and the wonderful sunsets . (Apologies for the odd little black spots -think my scanner must need a clean!)

I'm entering this in the Allsorts Challenge Blog for Colours of Autumn. I'm sad to think Summer is nearly over but I am looking forward to Autumn with the lovely autumn colours and long walks in the countryside, falling leaves, bare trees and the wonderful sunsets . (Apologies for the odd little black spots -think my scanner must need a clean!)
Wednesday, 28 July 2010
Spider Henry
Look at this wonderful digital image of Spider Henry illustrated by Alison Acton for Whiff of Joy - and it's FREE - you can get it here.
The design team have made some super cards and there is a gallery for everyone to post their cards - It always surprises me how everyone's card is so different even when using the exact same image.
I've coloured the image in with Copics and then used glossy accents over the red parts. I've cut the web on my Silhouette along with the background circle/arrow. I wasn't sure where I was going with this one and just about made it up as I went along. My nephew has a birthday early August so think this one will be spinning it's way to him.
So, that's two cards this week and I really must now get on with my holiday journal.....
Thanks for looking,
Sue
x
The design team have made some super cards and there is a gallery for everyone to post their cards - It always surprises me how everyone's card is so different even when using the exact same image.
I've coloured the image in with Copics and then used glossy accents over the red parts. I've cut the web on my Silhouette along with the background circle/arrow. I wasn't sure where I was going with this one and just about made it up as I went along. My nephew has a birthday early August so think this one will be spinning it's way to him.So, that's two cards this week and I really must now get on with my holiday journal.....
Thanks for looking,
Sue
x
Tuesday, 1 June 2010
Baby layout
Yet another layout completed for my daughter's Scrapbook Album. The photo's aren't of the best quality but they didn't make digital cameras in 1989 although I did work out that if I just copy the photo onto photo paper rather than scan them in and print them, they actually come out not too bad. It's one big learning curve.....
The Sir Stampalot June Challenge is "Punching" and although I used my Silhouette for most of my cutting, I have used the EK Success border punch for the matting of the photos and the two borders going over the page, so I hope that counts :) Yet again, some fabulous prizes are up for grabs so get on over there!
I've used my Silhouette to cut out the text and I'm loving this stork - it's designed by KI memories and available on the Silhouette Online Library. As I had done on my previous wedding layout, I cut out the footprints in the same pink colour to give the impression of embossing. The silhoutte is brilliant at cutting out even the tiniest of objects which you can see from the safety pin! The safety pin and footprints are images designed by Nathan Jenne, and again, are available in the library.
Nearly forgot to say, I was browsing through the Silhouette Blog over the weekend and what a pleasant surprise to see my layout on their Friday Blog! WOW, I was well chuffed :)
I'm really loving doing these layouts, they bring back so many memories. I've done a couple more this month and will post them later in the week.
Hope you all remembered your pinch and a punch for the first of the month!
Thanks for looking,
Sue
x
The Sir Stampalot June Challenge is "Punching" and although I used my Silhouette for most of my cutting, I have used the EK Success border punch for the matting of the photos and the two borders going over the page, so I hope that counts :) Yet again, some fabulous prizes are up for grabs so get on over there!I've used my Silhouette to cut out the text and I'm loving this stork - it's designed by KI memories and available on the Silhouette Online Library. As I had done on my previous wedding layout, I cut out the footprints in the same pink colour to give the impression of embossing. The silhoutte is brilliant at cutting out even the tiniest of objects which you can see from the safety pin! The safety pin and footprints are images designed by Nathan Jenne, and again, are available in the library.
Nearly forgot to say, I was browsing through the Silhouette Blog over the weekend and what a pleasant surprise to see my layout on their Friday Blog! WOW, I was well chuffed :)
I'm really loving doing these layouts, they bring back so many memories. I've done a couple more this month and will post them later in the week.
Hope you all remembered your pinch and a punch for the first of the month!
Thanks for looking,
Sue
x
Saturday, 27 March 2010
Easter cards
Here's a couple of cards for Easter. I have cut all the shapes out on my silhouette - both designs by Lori Whitlock who is a designer for Silhouette America - I find myself liking Lori's images the most out of all the designers - they seem to be the most versatile and easy to cut. 
I've just discovered glimmer mist and am holding myself back from spraying everything with it, LOL. The brad on the Happy Easter card is a Floradoodle which I have had in my stash for ages just waiting for the right time to use it. Am entering them in Charisma Cardz Challenge as their theme this week is Spring.
Saturday, 9 January 2010
Thank you card

A thank you card for my SIL for putting us up (or should that read putting up with us!) over the Christmas period. We had a really great time.
I had seen Nichol Magouirk making these cute butterflies using ribbon and had a go, but the paper ones came out much better. So, I incorporated it into my thank-you card, matting and layering it on a thank you background which in itself is matted onto a cuttlebug swirls background. The cut-out swirls were done on my silhouette along with the tag.
Thanks for looking,
Sue
I had seen Nichol Magouirk making these cute butterflies using ribbon and had a go, but the paper ones came out much better. So, I incorporated it into my thank-you card, matting and layering it on a thank you background which in itself is matted onto a cuttlebug swirls background. The cut-out swirls were done on my silhouette along with the tag.
Thanks for looking,
Sue
Sunday, 3 May 2009
Copic Colour Challenge No. 11
I have entered the Copic Colour Challenge which you can find here . It was a great excuse to get the Copics out - not that I need one. They are a joy to use, I LOVE them!
The Rules are:
This blog is a challenge blog for all copics marker addicts. The colours chosen are for a guide only. You may use 1 or all the colours if you desire.
Just make a card or other creation, using the image of your choice but try and follow the colour guide.
As long as you use at least one copic as close to one of the colours specified you may use any other medium as well.
Acid Yellow YO8, Brick Beige E31, Mint Green BG 13 are this week's colours.
I've not got the complete set (sigh...they are top of my wishlist) and didn't have exactly the colours stated so the nearest I could get were Yellow YO6, Burnt Umber E29 (blended with E21 and E00 on the fence) and various other colours.
What I wanted to try and create was a scene so first of all I stamped and clear embossed the background and coloured in with my Copics. I then chalked a cloudy sky. I coloured in the Sarah Kay image, cut round it and 3-d it on the page. Embellished with ribbon, sentiment, beads and a butterfly cut out on my Silhouette.
Thoroughly enjoyed the challenge and am already looking forward to next week's challenge!
The Rules are:This blog is a challenge blog for all copics marker addicts. The colours chosen are for a guide only. You may use 1 or all the colours if you desire.
Just make a card or other creation, using the image of your choice but try and follow the colour guide.
As long as you use at least one copic as close to one of the colours specified you may use any other medium as well.
Acid Yellow YO8, Brick Beige E31, Mint Green BG 13 are this week's colours.
I've not got the complete set (sigh...they are top of my wishlist) and didn't have exactly the colours stated so the nearest I could get were Yellow YO6, Burnt Umber E29 (blended with E21 and E00 on the fence) and various other colours.
What I wanted to try and create was a scene so first of all I stamped and clear embossed the background and coloured in with my Copics. I then chalked a cloudy sky. I coloured in the Sarah Kay image, cut round it and 3-d it on the page. Embellished with ribbon, sentiment, beads and a butterfly cut out on my Silhouette.
Thoroughly enjoyed the challenge and am already looking forward to next week's challenge!
Saturday, 2 May 2009
Wedding Anniversary card
Who would have thought it, 28 years married! It certainly doesn't feel like 28 years, I can remember our wedding day so very clearly and the years in between have just flown by. I am very lucky, Steve is a great husband, he's kind, considerate and very funny - well, he make's me laugh and that's what's most important. Here's to the next 28 years!
Although a very quick and simple Wedding Anniversary card, I just love this image. It sums up everything I feel about our marriage. I made it on my Silhouette cut out in Vinyl and decorated with three little hearts .
Thursday, 16 April 2009
Wedding card

This card took me forever to do - you know what it's like, trying to make decisions and what to do for the best. It is a card for my hubby's boss and it was from his section at work so I particularly wanted to try and do a good one. I knew I wanted to use the lovebirds and just took it from there. Practically everything was cut on my Silhouette, thank goodness for that lovely little machine! This is the insert for which I used papermania papers and a heart cut out. I found this beautiful poem by William Shakespeare and thought it was just perfect.
Friday, 27 March 2009
Crafting Friday
I had one day left of my annual leave to take before 1 April so decided to indulge myself and take today off specially for crafting.... how cool is that?! I'm having a great time and would love to make every Friday a crafting day :-) I've actually managed to finish off a mini calendar album that I had started for my daughter. It was supposed to be a Christmas pressie - so well past it's due date! Will post some pics later, once the glue has dried.
I'm going to have an hour or so now playing with my Silhouette learning how to print and cut which is where you can load clipart, print it and then cut it out on the Silhouette. Last time I tried this, it kept saying it couldn't read the registration marks. I didn't have time to play around with it then, so hopefully I should be able to get it going this time.....
Subscribe to:
Posts (Atom)